Holiday Bear Amigurumi Free Crochet Pattern – Adorable Seasonal Plush
Designer: LoveandStitchCo
Instagram: @loveandstitchco
Etsy Shop: LoveandStitchCo
Difficulty Level: Intermediate
A cozy holiday project to warm up your crochet time
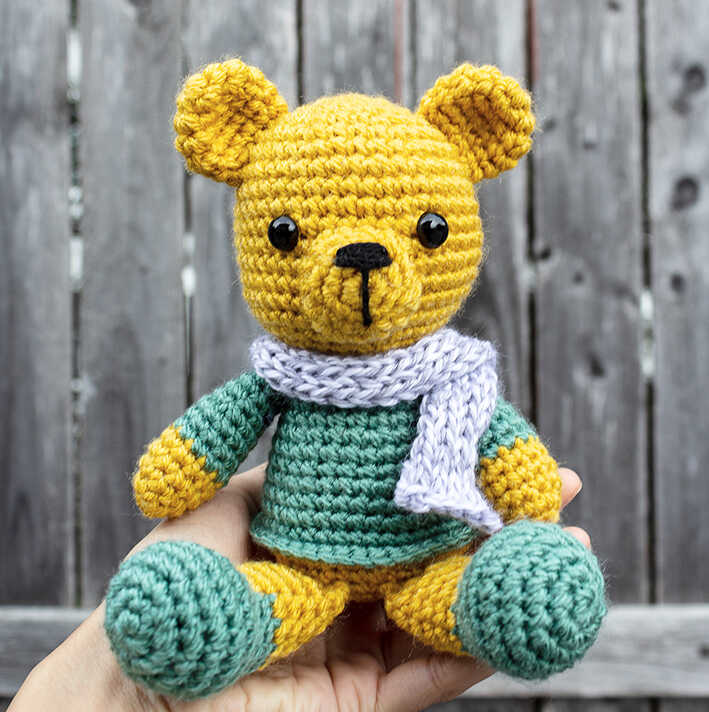
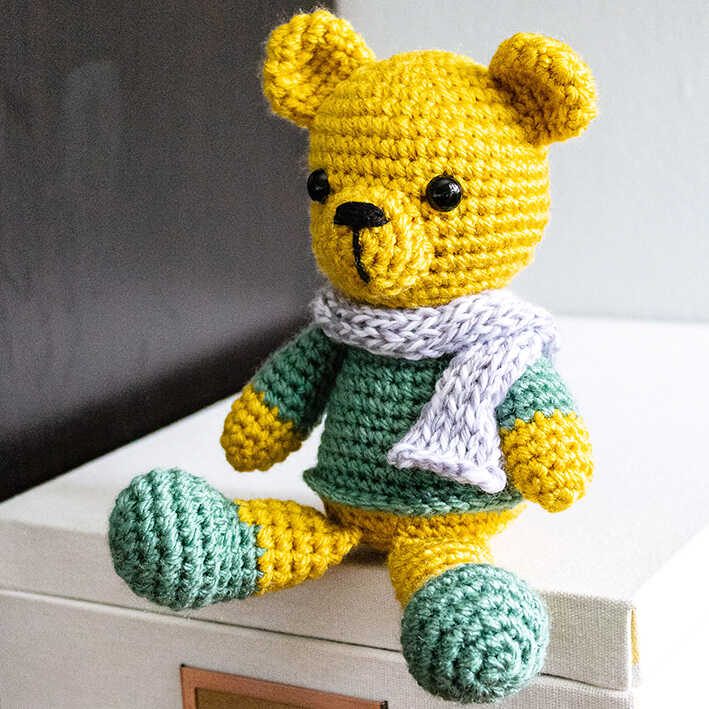
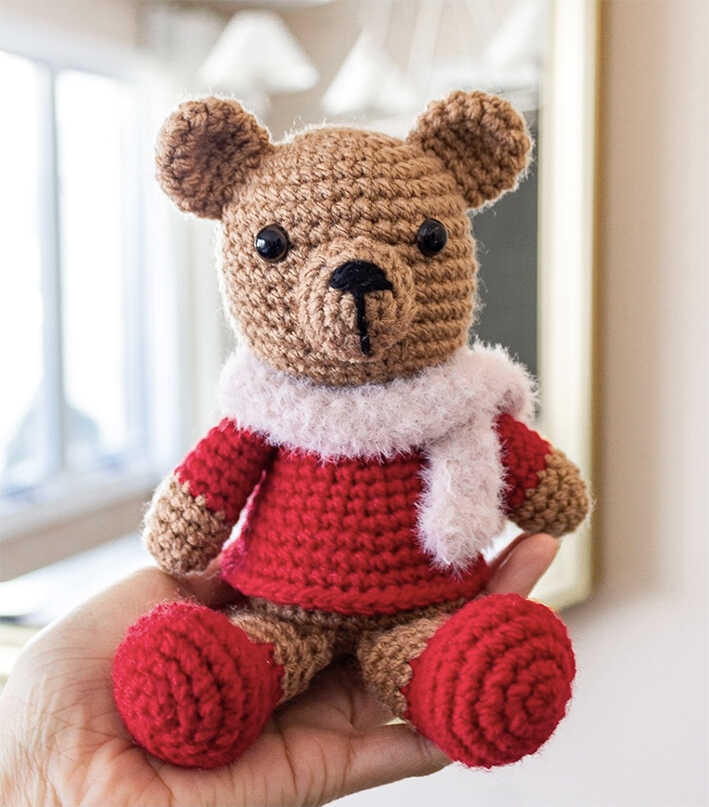
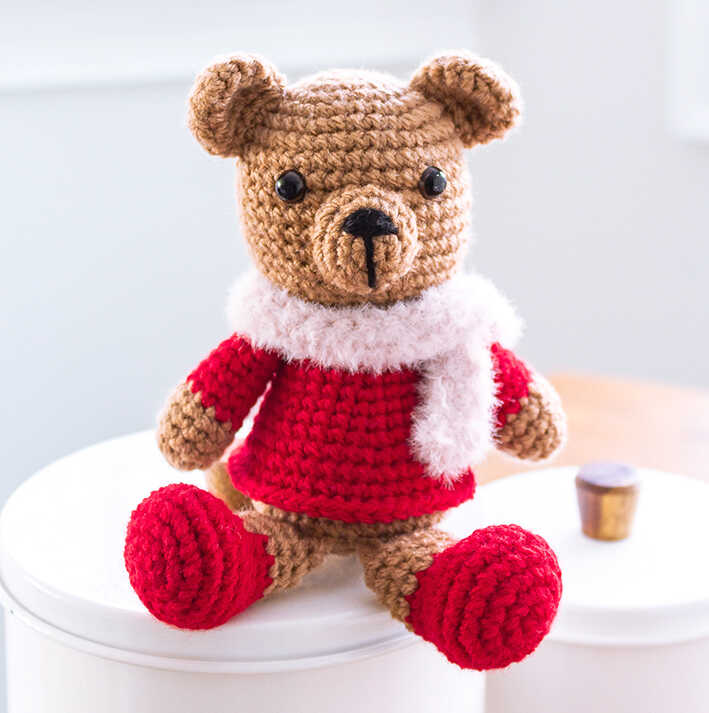
Bring festive handmade charm to your collection with this holiday bear amigurumi free crochet pattern designed by loveandstitchco, featuring the adorable Timothy. This sweet teddy in a cozy outfit makes a perfect handmade gift idea and a cheerful seasonal decor piece. We sincerely thank loveandstitchco for sharing this beautiful design, and you will also find inspiring holiday bear amigurumi ideas at the end of the pattern.
Want to see how this holiday bear comes together Scroll down to find the original pattern source.
This is a beginner crochet project with approachable shaping and simple details. Using Paintbox Simply Aran acrylic yarn and a 3.25 mm hook, the finished bear measures approximately 8 inches (20 cm) tall, making it ideal for gifts and festive displays. If you enjoy seasonal plush toys, you might also love the reindeer amigurumi from our blog.
The pattern creates a soft and cozy finish, while the scarf can be crocheted or knitted for extra charm. To complete this project, you only need yarn, fiberfill, safety eyes, and basic tools. For more festive animal ideas, check out the penguin amigurumi, and do not forget to explore the holiday-themed ideas shared at the end of the pattern.
This holiday bear is just the final look scroll to see every festive detail
Materials
Yarn: Paintbox yarns simply aran acrylic in:
A – Mustard Yellow (1 x 3.5 oz)
B – Slate Green (1 x 3.5 oz)
Hook: 3.25mm
Other: Fiberfill for stuffing
Safety eyes (9 mm)
Tapestry needle
Small amount of any desired yarn for the scarf
Small amount of black yarn for the nose
Knitting needles for the knitted scarf (optional)
Terminology
MR- magic ring
ch- chain
inc- increase
dec- decrease
Slst- slip stitch
BLO- back loop only
FLO- front loop only
CREATE A FESTIVE HOLIDAY BEAR AMIGURUMI STEP BY STEP
Head & Body
Using the color A (Mustard Yellow) yarn, begin with an MR.
Round 1: 6 sc in a magic ring [6]
Round 2: (inc in each st) x 6 [12]
Round 3: (1 sc; inc) x 6 [18]
Round 4: (2 sc; inc) x 6 [24]
Round 5: (3 sc; inc) x 6 [30]
Round 6: (4 sc; inc) x 6 [36]
Round 7: (8 sc; inc) x 4 [40]
Round 8–14: sc in each st around [40]
Round 15: (sc in next 8 sts; dec) x 4 [36]
Attach safety eyes between rounds 10 and 11, with 7 sts apart.
Round 16: (4 sc; dec) x 6 [30]
Round 17: (3 sc; dec) x 6 [24]
Round 18: (2 sc; dec) x 6 [18]
Round 19: sc in each st around [18]
Round 20: (5 sc; inc) x 3 [21]
Change to color B (Slate Green) yarn
Round 21: (6 sc; inc) x 3 [24]
Round 22–23: sc in each st around [24]
Start stuffing the head as you work along with the body.
Round 24: (3 sc; inc) x 6 [30]
Round 25-26: sc in each st around [30]
Round 27: (4 sc; inc) x 6 [36 sts]
Round 28: sc in each st around [36]
Round 29: (5 sc; inc) x 6 [42]
Round 30: sc in each st around [42]
Change to color A (Mustard Yellow) yarn.
Round 31: sc through BLO in each st around [42]
Round 32: (5 sc; dec) x 6 [36]
Round 33: (4 sc; dec) x 6 [30]
Round 34: (3 sc; dec) around [24]
Start stuffing the body.
Round 35: (2 sc; dec) x 6 [18]
Round 36: (1 sc; dec) x 6 [12]
Round 37: (dec) x 6 [6]
Fill the body with fiberfill. F/O and thread tail end of yarn onto a tapestry needle, insert the needle in and out of the remaining stitches, pull tight to close and weave in the end.
Legs (make 2)
Using the color B (Slate Green) yarn, begin with an MR.
Round 1: 6 sc in MR [6]
Round 2: (inc) x 6 [12]
Round 3: (1 sc; inc) x 6 [18]
Round 4: (2 sc; inc) x 6 [24]
Round 5–6: sc in each st around [24]
Round 7: (2 sc; dec) x 6 [18]
Round 8: (dec) x 4, sc in next 10 sts [14]
Round 9: (dec) x 2, sc in next 10 sts [12]
Change to color A (Mustard Yellow) yarn.
Round 10–14: sc in each st around [12]
Stuff and shape the foot firmly, stuff the bottom of the leg lightly. Flatten the top of the leg together, and sc in next 6 sts through both sides. F/O leaving a tail for sewing.

Arms (make 2)
Using the color A (Mustard Yellow) yarn, begin with an MR.
Round 1: 6 sc in MR [6]
Round 2: (inc) x 6 [12]
Round 3–4: (sc in each st) x 6 [12]
Change to color B (Slate Green) yarn.
Round 5–8: sc in each st around [12]
Round 9: (4 sc; dec) x 6 [10]
Round 10–12: sc in each st around [10]
Stuff the arm with fiberfill. Flatten the top of the arm in half and sc in next 4sts through both sides. F/O leaving a tail for sewing.
Ears (make 2)
Using the color A (Mustard Yellow) yarn, begin with an MR.
Round 1: 6 sc in MR
Round 2: (inc) x 6 [12]
Round 3: (1 sc; inc) x 6 [18]
Round 4: (4 sc; dec) x 3 [15]
Round 5: (3 sc; dec) x 3 [12]
Round 6: sc in each st around [12]
Sl st into the next stitch and F/O leaving a tail for sewing. Do not stuff the ears, only flatten them in half.
Muzzle
Using the color A (Mustard Yellow) yarn, begin with an MR.
Round 1: 6 sc in MR
Round 2: (1 sc; inc) x 3 [9]
Round 3: (2 sc; inc) x 3 [12]
Round 4: (3 sc; inc) x 3 [15]
Sl st into the next stitch and F/O leaving a tail for sewing.
Tail
Using the color A (Mustard Yellow) yarn, begin with an MR.
Round 1: 6 sc in MR
Round 2: (inc) x 6 [12]
Round 3: (1 sc; inc) x 6 [18]
Round 4: (1 sc; dec) x 6 [12]
Assembly
1. Holding the body upside down, attach the color B yarn, in the front loop of round 31. Pull up a loop and working in the FLO make a sc in each st around, sl st into the first sc. F/O and weave in the end.
2. Use black yarn to embroider a nose on to the muzzle. stuff the muzzle lightly and center it between the eyes. Sew the muzzle on neatly.
3. Position the ears evenly on the sides of the head. I have placed them on rounds 4 to 7 starting from the top. Sew them into place
4. The arms are sewn directly under the head.
5. Sew the tail onto the back of the body.
Knitted scarf
Using the desired color yarn and knitting needles cast on 6 sts.
Work in stockinette stitch until scarf measures approximately 10 inches, then cast off.
Crochet scarf
Using the desired color yarn, chain 7.
Row 1: sc in 2nd ch from the hook and in each ch across, ch 1 and turn [6]
Row 2: sc in each st across BLO, ch 1 and turn [6]
Repeat the row 2 until scarf measures 10 inches, or the desired length. F/O and weave in the end