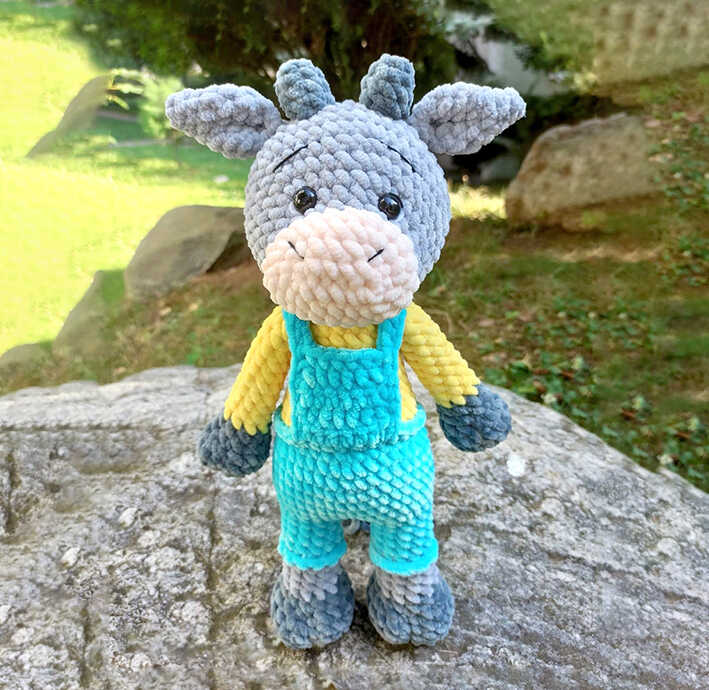
Crochet Bull Amigurumi Free Pattern – A Sweet Farm Plush Idea
Designer: Tatis Toys
Instagram: @tatistoys
Difficulty Level: Beginner
A colorful farm project to energize your crochet time
Add a playful farm touch to your handmade collection with this bull amigurumi free crochet pattern designed by Tatis Toys, also known as Tatiana. With its bright outfit and expressive details, this cute crochet animal stands out as a fun handmade gift idea or a cheerful decor piece. The multi-color design brings a lively feel, making it perfect for cozy crochet sessions. We sincerely thank Tatiana for sharing this creative design, and you will also find inspiring bull amigurumi ideas at the end of the pattern.
Curious how this colorful bull comes together Scroll down to find the original pattern source and begin your project.
This is a beginner crochet project built with basic stitches, making it a great small crochet project despite its detailed look. The step-by-step structure helps you handle multiple color changes with ease, turning it into a rewarding quick crochet project. If you enjoy farm animals, you might also love the cow amigurumi from our blog.
The pattern is designed using cotton yarn for a neat and defined finish, while color variations allow you to personalize the final look. To complete this project, you will need yarn, fiberfill, and basic tools. For more animal ideas, check out the pig amigurumi, and do not forget to explore the bull-themed ideas shared at the end of the pattern.
This bull looks complete scroll to see how each colorful part is made
Abbreviations
MR – Amigurumi Magic ring
sc : Single Crochet
inc : Increase
dec : Decrease
st: Stitch
sl-st : Slip Stitch
ch : Chain
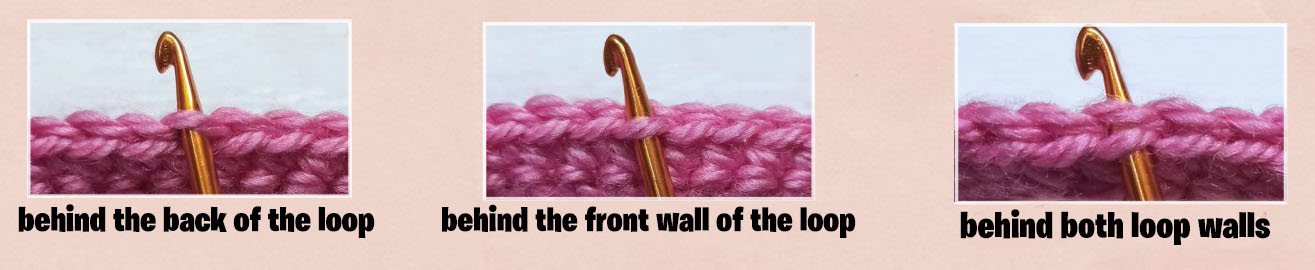
FLO : Crochet into front loops only
BLO : Crochet into back loops only
CREATE A MINI BULL AMIGURUMI STEP BY STEP
Arms (x2)
Hoof color.
Round 1) 2ch, in the 2nd from the hook 6sc (6)
Round 2) (inc) repeat 6 times (12)
Round 3) (3sc, inc) repeat 3 times (15)
Round 4) 15sc
Round 5) (3sc, dec) repeat 3 times (12)
Round 6) (2sc, dec) repeat 3 times (9)
Round 7) 9sc
Change the yarn to the color of the blouse.
Round 8-17) 9sc (10 rows)
Fold in half and close with 4sc.
Legs (x2):
Hoof color.
Round 1) 2ch, in the 2nd from the hook 6sc (6)
Round 2) (inc) repeat 6 times (12)
Round 3) (2sc, inc) repeat 4 times (16)
Round 4) (3sc, inc) repeat 4 times (20)
Round 5) BLO 20sc
Round 6) 20sc
Round 7) (3sc, dec) repeat 4 times (16)
Round 8) (2sc, dec) repeat 4 times (12)
Change yarn to body color.
Round 9-12) 12sc (4 rounds)
Change the yarn to the color of the pants.
Round 13) BLO 12sc
Round 14-16) 12sc (3 rounds)
Do not cut the yarn on the 2nd leg, we will continue to crochet the body.
Body:
Connect the legs 3ch.
Round 1) 12sc, 3sc on ch, 12sc, 3sc on the other side of ch (30)
Round 2) (4sc, inc) repeat 6 times (36)
Round 3) 3sc, inc, 6sc, inc, 9sc, inc, 6sc, inc, 8sc (40)
Round 4-7) 40sc (4 rows) move the marker to the middle of the back.
Round 8) (8sc, dec) repeat 4 times (36)
Round 9) 36sc
Round 10) (4sc, dec) repeat 6 times (30)
Change the yarn to the color of the sweater.
Round 11) BLO 30sc
Round 12) 30sc
Round 13) (3sc, dec) repeat 6 times (24sc
Round 14-16) 24sc (3 row)
Round 17) (6sc, dec) repeat 3 times (21)
Round 18) 21sc
Round 19) (5sc, dec) repeat 3 times (18)
Marker in the middle of the back, make an offset loop if necessary.
We sew arms in the 20th row.
Round 20) 2sc, 4sc on the arm and body, 5sc, 4sc on the arm and body, 3sc (18)
Round 21) (4sc, dec) repeat 3 times (15)
Head:
Face color.
Round 1) 6ch, in the 2nd from the hook inc, 3sc, 3sc in the last st, 4sc (12)
Round 2) (inc) repeat 2 times, 3sc, (inc) repeat 3 times, 3sc, inc (18)
Round 3) (sc, inc) repeat 2 times, 3sc, (sc, inc) repeat 3 times, 4sc, inc (24)
Round 4) 24sc +2sc offset (marker on the side in the middle)
Round 5) (4sc, dec) repeat 4 times (20)
Change yarn to body color.
Round 6) (inc, 2sc) repeat 3 times, inc, 10sc (24)
Round 7) (inc, 3sc) repeat 3 times, inc, 11sc (28)
Round 8) (inc, 4sc) repeat 3 times, inc, 12sc (32)
Round 9) (inc, 5sc) repeat 3 times, inc, 13sc (36)
Round 10) (inc, 6sc) repeat 3 times, inc, 14sc (40)
Round 11) (inc, 7sc) repeat 3 times, inc, 15sc (44)
Insert eyes between 7 and 8 rows at a distance of 6sc.
Round 12-14) 44sc (3 row)
Round 15) (20sc, dec) repeat 2 times (42)
Round 16) (5sc, dec) repeat 6 times (36)
Round 17) (4sc, dec) repeat 6 times (30)
Round 18) (3sc, dec) repeat 6 times (24)
Round 19) (2sc, dec) repeat 6 times (18)
Round 20) (sc, dec) repeat 6 times (12)
Round 21) (dec) repeat 6 times (6)
Pull off the hole and hide the yarn.
When tightening the eyes, insert the needle from below between 12 and 13 rows.
Ears (x2):
Round 1) 2ch, in the 2nd from the hook 4sc (4)
Round 2) (sc, inc) repeat 2 times (6)
Round 3) (sc, inc) repeat 3 times (9)
Round 4) (2sc, inc) repeat 3 times (12)
Round 5-6) 12sc (2 rounds)
Round 7) (2sc, dec) repeat 3 times (9)
Round 8) Fold in half and 4sc
Round 9) Fold again and 2sc
Horns (x2):
Round 1) 2ch, in the 2nd from the hook 6sc (6)
Round 2) (2sc, inc) repeat 2 times (8)
Round 3-4) 8sc (2 row)
Tail:
Round 1) 2ch, in the 2nd from the hook 5sc (5)
Round 2-9) 5sc (8 rows)
After the 3rd row, thread the brush through the tip of the tail and secure.
Pants Binding:
Mark 7 stitches at the center front.
Attach yarn in FLO, ch 1, do not turn.
Work 7 sc in FLO.
Repeat for 4 rows:
ch 1, turn, 7 sc.
Fasten off.
Straps and Edging:
At the back, mark 3 stitches to the left and right of the center marker.
Attach yarn to the 3rd stitch left of the marker.
Work in FLO:
- 8 sc
- 5 sc evenly along the side of the apron
- ch 17
Sl st into the 3rd stitch to the right of the back marker
(this forms the crossed straps)
Work back along the chain:
- 16 sc
- 6 sc along the top edge of the apron
- ch 17
Sl st into the starting point (3rd stitch left of marker)
Work back:
- 16 sc along the chain
- 5 sc along the edge of the apron
Continue working sc in FLO around to the starting point.
Legs Edge
Work in FLO of Round 13:
- 12 sc
Copyright & Credits
This pattern is designed by Tatis Toys. The pattern itself may not be copied, rewritten, or redistributed in any form without permission from the original designer. You are welcome to sell finished items made from this pattern, provided that credit is given to Tatis Toys as the designer.