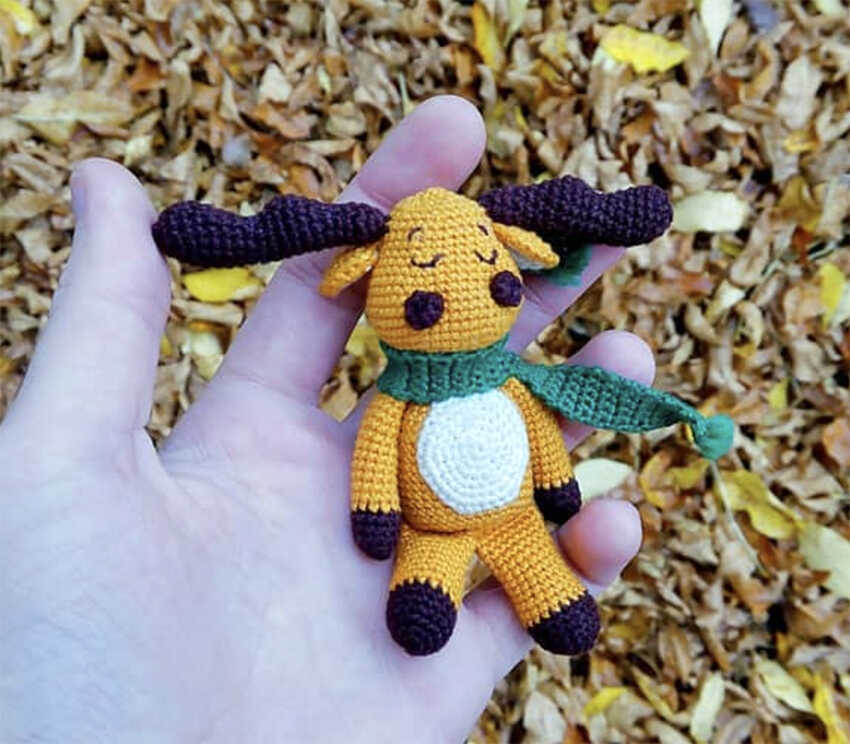
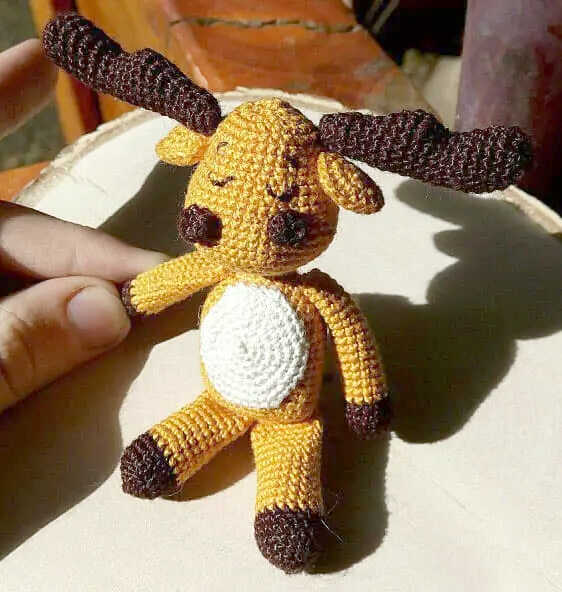
Cute Moose Free Amigurumi Crochet Pattern
Designer: Viktoria Anikina
Difficulty Level: Intermediate
A Woodland Crochet Favorite Full of Handmade Character.
Woodland animals make timeless crochet companions, and this cute Arkady the moose amigurumi pattern is packed with personality. Designed by Viktoria Anikina, this charming cute crochet animal is a wonderful handmade gift idea for woodland lovers and collectors of unique amigurumi. We sincerely thank Viktoria Anikina for sharing this delightful moose design with the crochet community.
This intermediate amigurumi pattern includes shaping, assembly, and finishing details that help bring the character to life. If you enjoy forest-inspired projects, you might also love the adorable deer amigurumi featured on one of our other crochet blogs.
Created with fine cotton yarn and a small hook, this small crochet project offers beautiful detail and a polished finish. If you enjoy woodland-themed makes, the sweet squirrel amigurumi is another charming design featured on one of our other crochet blogs. More related moose amigurumi ideas are waiting at the end of the pattern.
Love moose amigurumi? More charming woodland animal crochet favorites await below.
Materials
• Yarn
‣ Iris yarn – Light Brown
‣ Iris yarn – Dark Brown
‣ Iris yarn – White
‣ Iris yarn – Beige
‣ Iris yarn – Green
• 0.9 mm crochet hook
• Toy stuffing
• Sewing needle
• Scissors
Abbreviations
MR – magic ring
ch – chain
sl st – slip stitch
sc – single crochet
inc – increase
dec – decrease
(…) x n – repeat the instructions in parentheses n times
HOW TO CROCHET A CUTE MOOSE AMIGURUMI
Head
Using light brown yarn:
R1: 6 sc in MR (6)
R2: inc x 6 (12)
R3: (1 sc, inc) x 6 (18)
R4: (2 sc, inc) x 6 (24)
R5: (3 sc, inc) x 6 (30)
R6: (4 sc, inc) x 6 (36)
R7: (5 sc, inc) x 6 (42)
R8: (6 sc, inc) x 6 (48)
R9-R12: sc in each stitch around (48)
R13: (6 sc, dec) x 6 (42)
R14: sc in each stitch around (42)
R15: (5 sc, dec) x 6 (36)
R16: sc in each stitch around (36)
R17: (4 sc, dec) x 6 (30)
R18-R20: sc in each stitch around (30)
R21: (3 sc, dec) x 6 (24)
R22: sc in each stitch around (24)
R23: dec x 12 (12)
R24: dec x 6 (6)
Fasten off and leave a tail for sewing.
The finishing point of the head will be the top of the head.
Antlers (Make 2)
Using dark brown yarn:
R1: 6 sc in MR (6)
R2: (inc, 2 sc) x 2 (8)
R3-R5: sc in each stitch around (8)
R6: 2 inc, 6 sc (10)
R7: 1 sc, 2 inc, 7 sc (12)
R8: 2 sc, 2 inc, 8 sc (14)
R9: 3 sc, 2 inc, 9 sc (16)
R10: 3 sc, dec x 2, 9 sc (14)
R11: 2 sc, dec x 2, 8 sc (12)
R12: 1 sc, dec x 2, 7 sc (10)
R13: 2 sc, inc, 7 sc (11)
R14: 3 sc, inc, 7 sc (12)
R15: 4 sc, inc, 7 sc (13)
R16: 5 sc, inc, 7 sc (14)
R17: 6 sc, inc, 7 sc (15)
R18: 7 sc, inc, 7 sc (16)
R19: dec, 2 sc, dec x 3, 2 sc, dec x 2 (10)
R20: dec x 5 (5)
Fasten off and leave a tail for sewing.
Ears (Make 2)
Each ear consists of two layers.
Inner Ear (Make 2)
Using a light-colored yarn:
R1: 6 sc in MR (6)
R2: inc x 6 (12)
R3: (2 inc, 1 sc) x 4 (20)
Fasten off.
Outer Ear (Make 2)
Using light brown yarn:
R1: 6 sc in MR (6)
R2: inc x 6 (12)
R3: (2 inc, 1 sc) x 4 (20)
Do not cut the yarn.
Place one inner ear and one outer ear together and crochet or sew around the edge to join them into one ear.
Fasten off and leave a tail for sewing.
Nostrils (Make 2)
Using dark brown yarn:
R1: 6 sc in MR (6)
R2: (inc, 2 sc) x 2 (8)
Fasten off and leave a tail for sewing.
The nostrils should be attached with the wrong side facing outward to create a raised effect.
Body
Using light brown yarn:
R1: 6 sc in MR (6)
R2: inc x 6 (12)
R3: (4 sc, 2 inc) x 2 (16)
R4: (5 sc, inc, 1 sc, inc) x 2 (20)
R5: (6 sc, inc, 2 sc, inc) x 2 (24)
R6: (7 sc, inc, 3 sc, inc) x 2 (28)
R7: (8 sc, inc, 4 sc, inc) x 2 (32)
R8: (9 sc, inc, 5 sc, inc) x 2 (36)
R9-R20: sc in each stitch around (36)
R21: (6 sc, dec x 6) x 2 (24)
R22: (3 sc, dec x 4) x 2 (14)
R23: dec x 7 (7)
Fasten off, cut the yarn, and hide the end inside the body.
Belly
Using white or beige yarn:
R1: 6 sc in MR (6)
R2: inc x 6 (12)
R3: (1 sc, inc) x 6 (18)
R4: (2 sc, inc) x 6 (24)
R5: (3 sc, inc) x 6 (30)
R6: (4 sc, inc) x 6 (36)
Fasten off and leave a long tail for sewing.
Front Legs (Make 2)
Start with dark brown yarn:
R1: 6 sc in MR (6)
R2: inc x 6 (12)
R3-R5: sc in each stitch around (12)
Change to light brown yarn.
R6-R19: sc in each stitch around (12)
Stuff the hoof firmly and the leg lightly.
Fold flat and crochet 5 sc through both layers.
Fasten off and leave a tail for sewing.
Back Legs (Make 2)
Start with dark brown yarn:
R1: 6 sc in MR (6)
R2: inc x 6 (12)
R3: (1 sc, inc) x 6 (18)
R4-R6: sc in each stitch around (18)
Change to light brown yarn.
R7-R16: sc in each stitch around (18)
Stuff the hoof firmly and the leg lightly.
Fold flat and crochet 8 sc through both layers.
Fasten off and leave a tail for sewing.
Tail
Using light brown yarn:
R1: 6 sc in MR (6)
R2: inc x 6 (12)
Fasten off and leave a tail for sewing.
Scarf
Using green yarn:
R1: Ch 6
R2: 5 sc, ch 1
R3: 5 sc, ch 1
Continue repeating the previous row until the scarf reaches the desired length.
Final Row: 4 sc, sl st
Fasten off and weave in the ends.
Optional: Add fringe using small strands of dark brown or green yarn.
Assembly
Remember that the finishing point of the head is the top.
• Sew the nostrils to the head between R11 and R13, counting from the bottom.
• Sew the ears to the head between R18 and R19, counting from the bottom.
• Sew the antlers to the head between R20 and R21, counting from the bottom.
• Embroider the eyes and eyebrows.
• Sew the belly to the body around the edge, positioning it with two corners pointing upward.
• Sew the front legs to the body between R4 and R5, counting from the top.
• Sew the back legs perpendicular to the body. For the right leg, begin at the center of the closing ring and sew downward to the right. For the left leg, begin at the center of the closing ring and sew downward to the left.
• Sew the tail to the body between R18 and R19, counting from the top.
• Sew the head to the body so that the first 6 stitches of the head remain slightly forward, visible, and not attached to the body.
Your Arkady the Moose is ready!
Copyright & Credits
This pattern is designed by Viktoria Anikina. Please do not copy, redistribute, or republish this pattern without permission. You may sell finished items made from this pattern, but please credit the original designer when sharing your work.