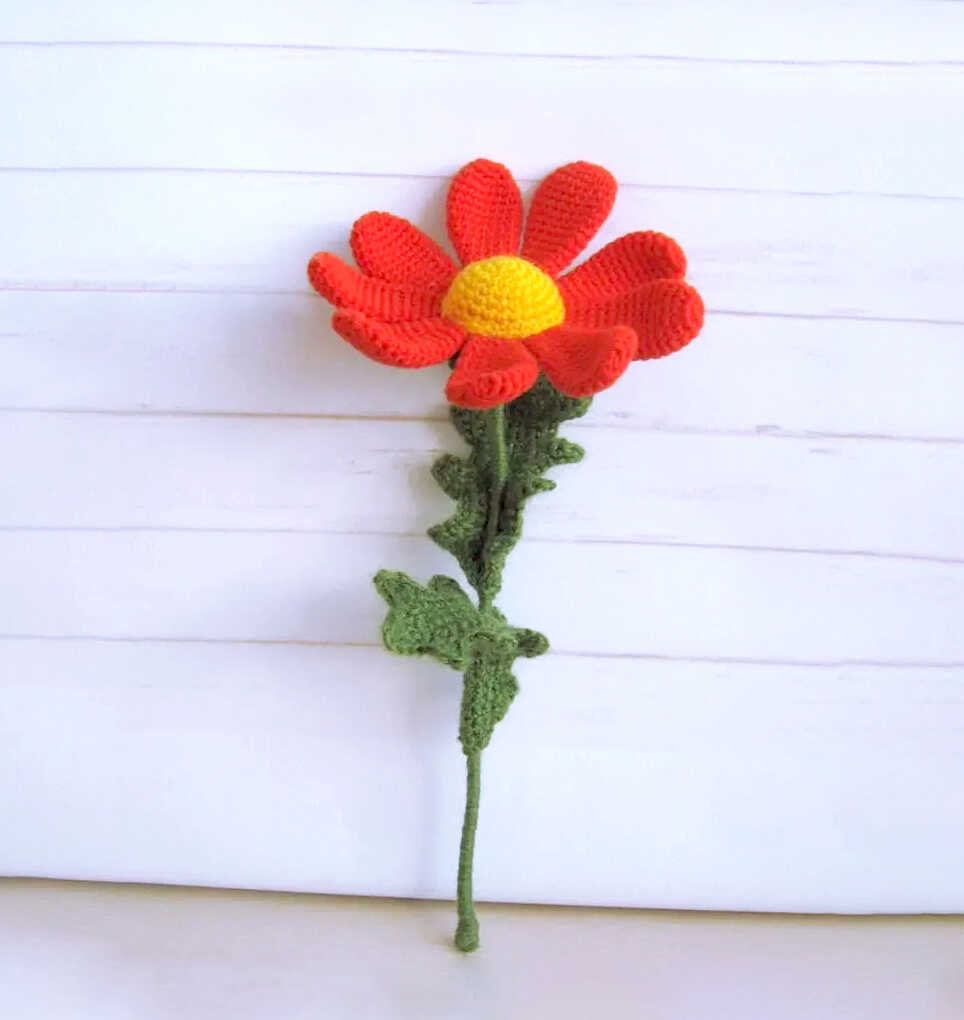
Beautiful Flower Free Crochet Pattern for Handmade Decor
Designer: Nadezhda Strakovskaya
Difficulty Level: Intermediate
A Beautiful Crochet Decor Project for Creative Handmade Spaces.
Floral crochet projects bring lasting charm to any room, and this beautiful flower crochet pattern is a lovely example. Designed by Nadezhda Strakovskaya, this decorative flower makes a wonderful handmade gift idea or colorful accent for shelves, desks, and cozy corners. We sincerely thank Nadezhda Strakovskaya for sharing this creative design with the crochet community.
This intermediate crochet pattern is perfect for using leftover yarn and experimenting with different color combinations. If you enjoy decorative handmade projects, you might also love the charming crochet cactus featured on one of our other crochet blogs.
Designed with acrylic, cotton, or cotton-blend yarn, this project offers plenty of customization while maintaining a neat finish. If you enjoy nature-inspired decor, the lovely crochet ladybug is another beautiful project featured on one of our other crochet blogs. More related crochet flower ideas are waiting at the end of the pattern.
Love crochet flowers? More beautiful floral crochet favorites are waiting below.
Materials
• Yarn
‣ Green yarn (stem, sepals, and leaf)
‣ Any color yarn for the petals
‣ Yellow yarn for the flower center
• Crochet hook
• Fiberfill stuffing
• Wire
• Adhesive tape
• Glue
• Sewing needle
• Scissors
Abbreviations
MR – magic ring
ch – chain
sc – single crochet
inc – increase
dec – decrease
(…) x n – repeat the instructions in parentheses n times
There are no specific yarn requirements. You can use any yarn and any colors you like. In addition to yarn, you will need a piece of wire for the stem, a small amount of adhesive tape, a little fiberfill for the flower center, and glue.
HOW TO CROCHET A BEAUTIFUL DECORATIVE FLOWER
Petal
Begin with 6 sc in MR.
R1: inc x 6 (12)
R2: sc in each stitch around (12)
R3: (1 sc, inc) x 6 (18)
R4-R7: sc in each stitch around (18)
R8: (dec, 7 sc) x 2 (16)
R9: sc in each stitch around (16)
R10: (dec, 6 sc) x 2 (14)
R11: sc in each stitch around (14)
R12: (dec, 5 sc) x 2 (12)
R13: sc in each stitch around (12)
R14: (dec, 4 sc) x 2 (10)
R15: sc in each stitch around (10)
R16: (dec, 3 sc) x 2 (8)
R17: sc in each stitch around (8)
R18: (dec, 2 sc) x 2 (6)
R19: dec x 3
The designer made 9 petals.
You may also decrease in every round instead. This creates shorter, wider petals, and only 6 petals will be needed.
Sepals
Using green yarn:
Ch 6 and join into a ring. This opening will be used later for inserting the stem.
R1: inc x 6 (12)
R2: sc in each stitch around (12)
R3: (1 sc, inc) x 6 (18)
R4: sc in each stitch around (18)
R5: (2 sc, inc) x 6 (24)
R6: sc in each stitch around (24)
R7: (3 sc, inc) x 6 (36)
R8: (3 sc, ch 2) x 11
Fasten off and leave a long tail for sewing.
Sew the petals to the sepals at two points.
First, sew through R4 of the sepals, passing completely through the petals. These green stitches will later be hidden by the flower center.
Then sew through R7 of the sepals, catching only one layer of each petal.
Stem
You will need wire, glue, green yarn, and pliers.
Cut a piece of wire.
Wrap one end with one or two turns of adhesive tape to cover the sharp cut end.
At the opposite end, measure approximately 4–5 cm from the tip and wrap the tape more thickly. This thicker section will support the flower during assembly.
Starting from the bottom, apply glue to approximately 3–4 cm of the wire and wrap green yarn tightly around it.
Leave the final 4–5 cm of the wire unwrapped.
To create volume near the flower bud, wrap several additional layers of yarn around the thickened section. Apply glue between each layer except the final one.
There is no need to glue the entire stem. Gluing the first 4 cm and the 4–6 cm nearest the flower bud is sufficient.
If desired, continue wrapping yarn along the entire stem to achieve the preferred thickness.
Insert the prepared stem through the opening in the sepals.
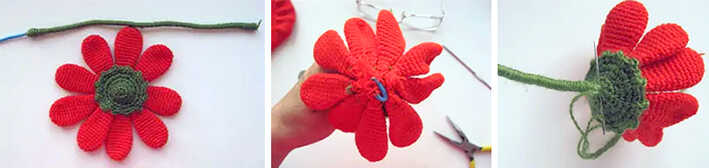
The wire extending through the center of the flower should be bent into a loop or ring, securing the sepals against the stem.
For extra security, wrap additional yarn around this section.
The designer describes the wire shape as a “T,” with yarn wrapped beneath the crossbar. This helps secure the petals and gives volume to the sepals.
Sew the stem to the flower for additional durability.
Flower Center (Stamens)
Using yellow yarn:
R1: inc x 6 (12)
R2: sc in each stitch around (12)
R3: (1 sc, inc) x 6 (18)
R4: sc in each stitch around (18)
R5: (2 sc, inc) x 6 (24)
R6: sc in each stitch around (24)
R7: (3 sc, inc) x 6 (36)
Sew the flower center in place.
Place a small amount of fiberfill underneath before attaching.
Make sure the yellow stitches do not show through from underneath.
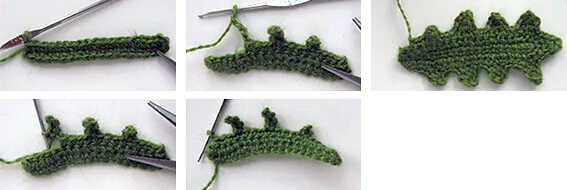
Leaf
Using green yarn:
Ch 19.
Row 1
Starting in the second chain from the hook:
17 sc, inc, continue on the opposite side of the chain with inc, 17 sc.
Turn.
Row 2
Starting in the second chain from the hook:
3 sc, ch 3, 2 sc into the chain space, 4 sc, ch 4, 3 sc into the chain space, 4 sc, ch 4, 3 sc into the chain space, 4 sc, ch 4, 3 sc into the chain space, 3 sc, ch 4 (leaf tip), 3 sc into the chain space, 3 sc, ch 4, 3 sc into the chain space, 4 sc, ch 4, 3 sc into the chain space, 4 sc, ch 4, 3 sc into the chain space, 4 sc, ch 3, 2 sc into the chain space, 3 sc.
Row 3
Work sc in every stitch and chain space around.
Assembly
Lightly steam the leaf if necessary.
Sew or glue the leaf to the stem.
Your flower is ready!
Copyright & Credits
This pattern is designed by Nadezhda Strakovskaya. Please do not copy, redistribute, or republish this pattern without permission. You may sell finished items made from this pattern, but please credit the original designer when sharing your work.