Snail Amigurumi Free Crochet Pattern – Cute Spiral Plush Toy
Designer: Irissesile
Instagram: @irissesile
Etsy Shop: Irissesile
Difficulty Level: Intermediate
A sweet little crochet project inspired by charming garden creatures
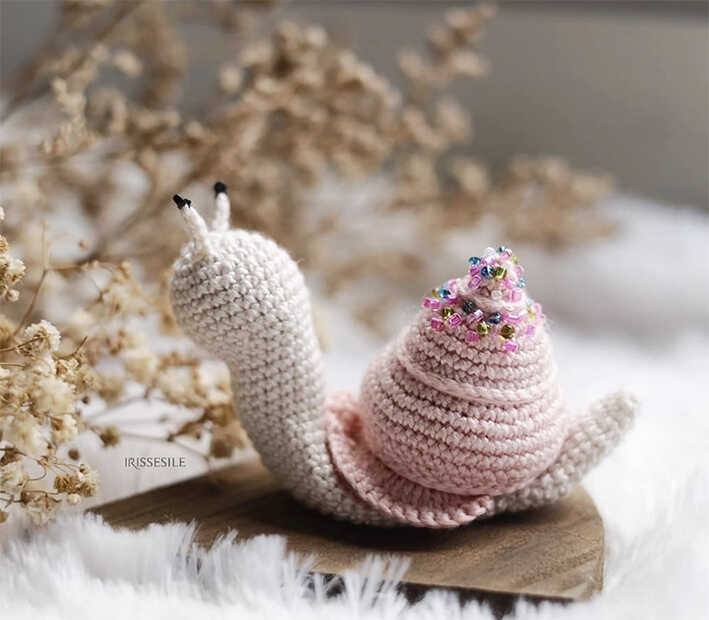
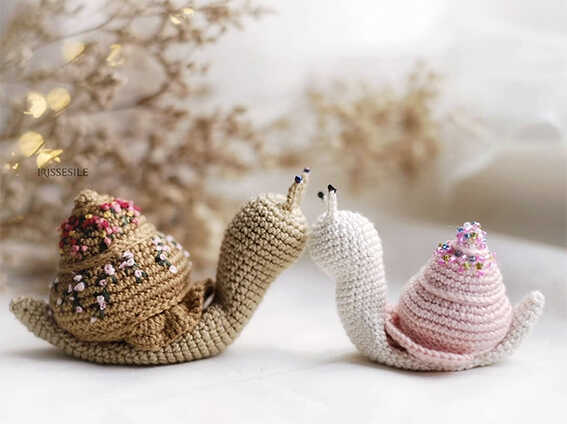
Small character amigurumi designs always bring extra personality to a handmade collection, and this free snail amigurumi pattern by Irissesile is a lovely pick for cozy crochet sessions. With its spiral shell and playful shape, this soft crochet toy makes a charming handmade gift idea or decorative shelf accent. We sincerely thank Irissesile for generously sharing this adorable snail design with the crochet community, and you’ll also find more related amigurumi ideas at the end of the pattern.
Looking for the original crochet pattern source? Scroll down to discover the full designer pattern.
This is a confident beginner-friendly amigurumi pattern with shaping details, decorative finishing, and a wire-supported structure, making it better suited for crocheters with a little experience. If you enjoy cute tiny creatures, you may also love the duck amigurumi from our blog.
Cotton yarn helps this small crochet project keep its crisp shape, while beads, sequins, or glitter can add extra charm to the shell. You only need yarn, a suitable hook, stuffing, wire, and basic tools to complete it. For another playful handmade animal, explore the ladybug amigurumi, and don’t forget to browse the related amigurumi ideas shared at the end of the pattern.
Keep scrolling for more adorable snail amigurumi ideas and charming garden crochet favorites.
Materials
• Yarn
‣ Two colors of your choice
• 2.2–2.5 mm crochet hook
• 0.7 mm wire
• Toy stuffing
• Beads, sequins, or glitter for decoration
• Embroidery thread
• Sewing needle
• Scissors
Abbreviations
MR – magic ring
ch – chain
sl st – slip stitch
sc – single crochet
dc – double crochet
inc – increase
dec – decrease
HOW TO CROCHET A FREE SNAIL AMIGURUMI PATTERN
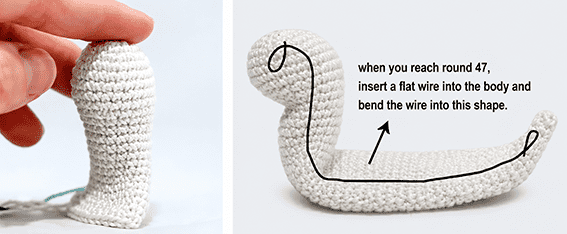
Body
R1: 6 sc in MR (6)
R2: inc x 6 (12)
R3: (1 sc, inc) x 6 (18)
R4: (2 sc, inc) x 6 (24)
R5-R9: sc in each stitch around (24)
R10: (2 sc, dec) x 6 (18)
R11-R18: sc in each stitch around (18)
R19: (2 sc, inc) x 6 (24)
R20-R21: sc in each stitch around (24)
R22: (3 sc, inc) x 6 (30)
R23-R30: sc in each stitch around (30)
R31: (3 sc, dec) x 6 (24)
R32-R36: sc in each stitch around (24)
R37: (2 sc, dec) x 6 (18)
R38-R42: sc in each stitch around (18)
R43: (1 sc, dec) x 6 (12)
R44-R47: sc in each stitch around (12)
R48: dec x 6 (6)
R49: sc in each stitch around (6)
Fasten off and cut the yarn. Stuff only the head (R1-R19). Do not stuff the rest of the body.
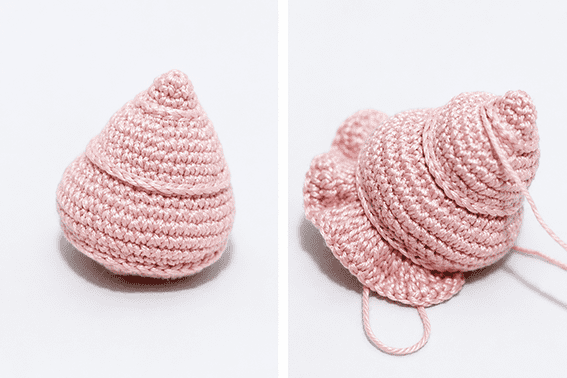
Shell
R1: 6 sc in MR (6)
R2: sc in each stitch around (6)
R3: inc x 6 (12)
R4: BLO sc in each stitch around (12)
R5: (1 sc, inc) x 6 (18)
R6: (2 sc, inc) x 6 (24)
R7: (3 sc, inc) x 6 (30)
R8-R10: sc in each stitch around (30)
R11: BLO sc in each stitch around (30)
R12: (4 sc, inc) x 6 (36)
R13: (5 sc, inc) x 6 (42)
R14: (1 sc, inc) x 14 (56)
R15-R17: sc in each stitch around (56)
R18: (1 sc, dec) x 14 (42)
R19: BLO sc in each stitch around (42)
R20: BLO (5 sc, dec) x 6 (36)
R21: (4 sc, dec) x 6 (30)
R22: (3 sc, dec) x 6 (24)
R23: (2 sc, dec) x 6 (18)
R24: (1 sc, dec) x 6 (12)
R25: dec x 6 (6)
Add stuffing, close the opening, and fasten off.
Shell Ruffle (Half Only)
Attach new yarn to stitch 1 of R20.
R1: dc inc x 18 (36)
R2: ch 1, 15 sc, 6 dc, 15 sc, sl st (36)
Fasten off, leaving a long tail for sewing.
Antennae
Ch 5. Starting in the second chain from the hook:
• 1 sl st
• 4 sl st
Sew black beads onto the tips as eyes, or embroider them with black yarn.
Assembly
• Go back to the front loops left unworked in R4, R11, and R19. Attach new yarn in the same color and work sl st and sc around the remaining loops.
• When finished, take another strand of yarn and insert it from any point near the slip stitches (only for R4 and R11), then work slip stitches to reinforce the shape.
• Place the shell on the flat part of the body and sew it slightly toward the tail.
• Sew the antennae onto the head between R2 and R3.
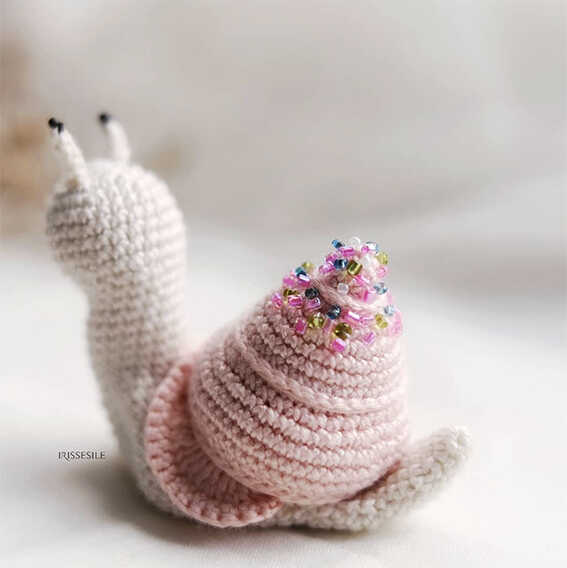
• Decorate the shell with beads and French knots if desired.
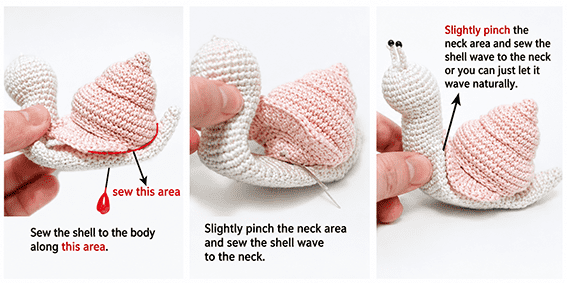
• Slightly flatten the neck area and sew the shell ruffle to the neck, or allow it to drape naturally and stitch that section closed.
Your snail is ready!
Copyright & Credits
This pattern is designed by Cecilia (@irissesile). Please do not copy, redistribute, or republish this pattern without permission. You may sell finished items made from this pattern, but please credit the original designer when sharing your work.