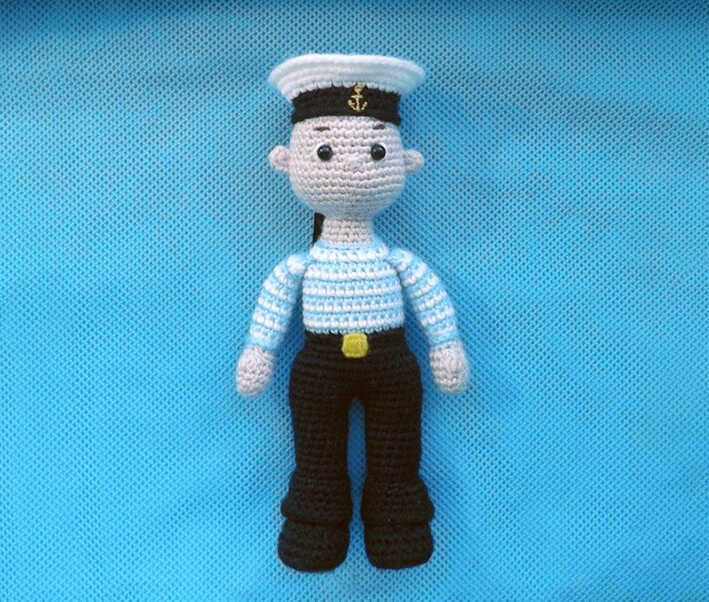
Cute Sailor Doll Free Amigurumi Crochet Pattern
Designer: Svetlana Lyutova
Instagram: @svet_lana_lyutova
Difficulty Level: Intermediate
A Charming Character Crochet Project Inspired by Seaside Adventures.
Character dolls always add personality to a crochet collection, and this sailor doll amigurumi pattern is full of nautical charm. Designed by Svetlana Lyutova, this detailed handmade character makes a wonderful handmade gift idea, shelf display, or keepsake for doll lovers. We sincerely thank Svetlana Lyutova for sharing this creative design with the crochet community.
This intermediate amigurumi pattern includes shaping, assembly, and decorative details that help bring the sailor character to life. If you enjoy character-based projects, you might also love the adorable doll amigurumi featured on one of our other crochet blogs.
Made with acrylic or cotton-blend yarn, this project creates a finished doll measuring approximately 17.5 cm tall. If you enjoy collectible crochet characters, the sweet bear amigurumi is another delightful design featured on one of our other crochet blogs. More related sailor doll amigurumi ideas are waiting at the end of the pattern.
Materials
• Yarn
‣ Acrylic yarn – White
‣ Acrylic yarn – Light Blue
‣ Acrylic yarn – Skin Tone
‣ Acrylic yarn – Black
‣ Acrylic yarn – Yellow (small amount)
• 1.6 mm crochet hook
• 5 mm safety eyes
• Toy stuffing
• Small piece of black raincoat fabric for the sailor cap
• Plastic lid for the insoles
• Cotton swab
• Glue
• Sewing needle
• Scissors
Abbreviations
MR – magic ring
ch – chain
sl st – slip stitch
sc – single crochet
inc – increase
dec – decrease
Puff stitch (3 dc) – yarn over and insert the hook into the stitch. Pull up a loop. Yarn over and pull through the first two loops only. Repeat this process two more times in the same stitch. There will be four loops on the hook. Yarn over and pull through all loops together.
(…) x n – repeat the instructions in parentheses n times
HOW TO CROCHET A CUTE SAILOR DOLL AMIGURUMI
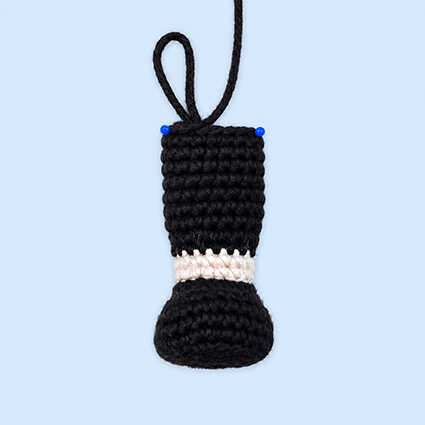
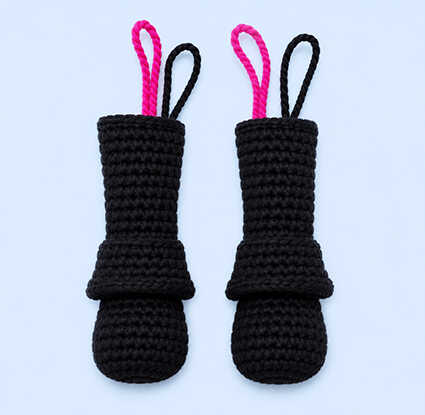
Legs (Make 2)
Both legs are worked the same way.
Using black yarn:
Ch 6
R1: Starting in the second chain from the hook: 4 sc, 3 sc in the last chain, continue on the opposite side of the chain: 3 sc, inc (12)
R2: inc, 3 sc, 3 inc, 3 sc, 2 inc (18)
R3: 1 sc, inc, 4 sc, inc, 1 sc, inc, 1 sc, inc, 4 sc, inc, 1 sc, inc (24)
Trace the finished sole onto plastic and cut out an insole. Melt the cut edges of the plastic insole with a flame to smooth them.
R4: BLO 24 sc
R5-R6: 24 sc
R7: 6 sc, 6 dec, 6 sc (18)
Insert the plastic insole.
R8: 6 sc, 3 dec, 6 sc (15)
Change to skin-tone yarn. Do not cut the black yarn.
R9: BLO 15 sc
R10-R11: 15 sc
Stuff firmly with fiberfill.
Change back to black yarn.
R12: 15 sc
R13: BLO 15 sc
R14-R19: 15 sc
R20: inc, 14 sc (16)
In the next round, place the increases exactly on the sides.
Turn the leg so the toe faces you, fold it flat, and work the increases into the edge stitches.
R21: 6 sc, inc, 6 sc, inc, 2 sc (18)
R22: 18 sc
Fasten off and cut the yarn.
Make the second leg the same way, but do not cut the yarn after R22.
Pants Bottom
Join black yarn to the remaining front loops of R13.
R1: 15 sc
R2: (4 sc, inc) x 3 (18)
R3: (5 sc, inc) x 3 (21)
R4: (6 sc, inc) x 3 (24)
R5: 24 sc
Fasten off and cut the yarn.
Joining the Legs
Place both legs together with the toes facing forward.
Mark one stitch on each leg where the legs touch. This point should be the center of the inner thigh.
Continue crocheting on the left leg up to the marker.
Work 1 sc in the marked stitch of the left leg, 1 sc in the marked stitch of the right leg, 17 sc around the right leg, 1 sc into the left leg (36).
Count the stitches to make sure you have 36.
Place a marker. This is the new beginning of the round.
Body
R1-R4: 36 sc
R5: 6 sc, 3 dec, 12 sc, 3 dec, 6 sc (30)
Before continuing, decide how you want to make the belt.
If you plan to crochet the belt separately and sew it on later, work R6 and R8 through both loops.
If you want to make the belt as the designer did, continue as follows:
R6: BLO 30 sc
R7: 30 sc
Change to light blue yarn.
R8: BLO 30 sc
Alternate white and light blue rounds:
R9: White yarn – 30 sc
R10: Light blue yarn – 30 sc
R11: White yarn – 30 sc
R12: Light blue yarn – 30 sc
R13: White yarn – 30 sc
R14: Light blue yarn – 30 sc
R15: White yarn – 30 sc
R16: Light blue yarn – 30 sc
R17: White yarn – (3 sc, dec) x 6 (24)
R18: Light blue yarn – (2 sc, dec) x 6 (18)
Change to skin-tone yarn.
R19: BLO (4 sc, dec) x 3 (15)
R20-R22: 15 sc
Finish with a sl st, leaving a long tail for sewing.
Stuff the body firmly.
Join black yarn to the remaining front loops of R6 and wrap each loop with yarn to define the belt area.
Repeat around the remaining front loops of R8.
If you crocheted the belt separately, sew it around the waist instead.
Embroider a yellow buckle onto the belt and insert a cotton swab into the neck.
The body is now complete.
Head
Using skin-tone yarn:
R1: 6 sc in MR (6)
R2: inc x 6 (12)
R3: (1 sc, inc) x 6 (18)
R4: (2 sc, inc) x 6 (24)
R5: (3 sc, inc) x 6 (30)
R6: (4 sc, inc) x 6 (36)
R7-R12: 36 sc
R13: (5 sc, inc) x 6 (42)
R14-R16: 42 sc
R17: (5 sc, dec) x 6 (36)
R18: (4 sc, dec) x 6 (30)
R19: (3 sc, dec) x 6 (24)
R20: (2 sc, dec) x 6 (18)
R21: (4 sc, dec) x 3 (15)
Finish with a sl st and cut the yarn.
Ears (Make 2)
Using skin-tone yarn:
R1: 6 sc in MR (6)
Tighten the ring, but do not join.
Leave a tail for sewing.
Arms (Make 2)
Both arms are worked the same way.
Using skin-tone yarn:
R1: 6 sc in MR (6)
R2: inc x 6 (12)
R3-R4: 12 sc
R5: 1 sc, 1 puff stitch (3 dc) in the next stitch, ch 1, 10 sc (13)
R6: 2 dec, 9 sc (11)
Join light blue yarn.
R7: 4 sc, 2 dec, 3 sc (9)
Join white yarn.
R8: BLO 3 sc, inc, 4 sc, inc (11)
Continue alternating white and light blue yarn:
R9: Light blue yarn – 11 sc
R10: White yarn – 11 sc
R11: Light blue yarn – 11 sc
R12: White yarn – 11 sc
R13: Light blue yarn – 11 sc
R14: White yarn – 11 sc
R15: Light blue yarn – 11 sc
R16: White yarn – 11 sc
R17: Light blue yarn – 11 sc
R18: White yarn – 11 sc
Stuff lightly with fiberfill.
Fold the arm flat so the thumb sits on the side.
If necessary, work a few offset stitches using only the light blue yarn.
R19: Using light blue yarn, work 5 sc through both layers.
Leave a long tail for sewing.
Shirt Cuff
Join light blue yarn to the remaining front loops of R8.
Work 9 sl st around.
Fasten off and weave in the end.
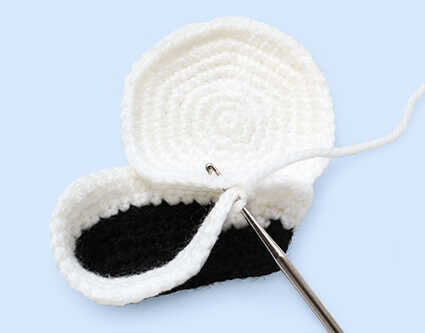
Sailor Cap
Top of the Sailor Cap
Using white yarn:
R1: 6 sc in MR (6)
R2: inc x 6 (12)
R3: (1 sc, inc) x 6 (18)
R4: (2 sc, inc) x 6 (24)
R5: (3 sc, inc) x 6 (30)
R6: (4 sc, inc) x 6 (36)
R7: (5 sc, inc) x 6 (42)
R8: (6 sc, inc) x 6 (48)
Fasten off and cut the yarn.
Base of the Sailor Cap
Using black yarn:
Ch 30.
Do not make the chains too tight.
Join into a ring and try it on the head. The ring should fit easily over the top of the head.
R1-R3: 30 sc
Join white yarn.
R4: (1 sc, inc) x 7, 2 inc, (1 sc, inc) x 7 (46)
R5: inc, 22 sc, inc, 22 sc (48)
R6: 48 sc
Do not cut the yarn.
Place the top section of the sailor cap against the base with the right sides facing outward.
Work through both layers:
R7: 48 sc
Fasten off, cut the yarn, and hide the yarn tail inside.
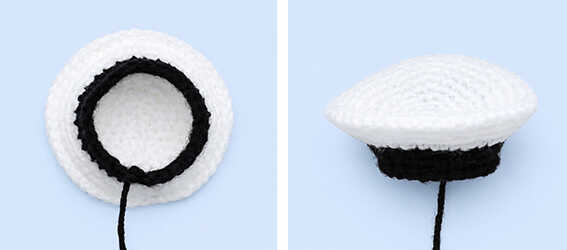
Embroider lettering or an anchor on the cap if desired.
Cut two ribbons from black raincoat fabric and sew them to the back of the cap. To prevent fraying, melt the cut edges slightly before attaching.
You may crochet the ribbons instead if preferred.
Using black yarn, work slip stitches around the bottom edge of the sailor cap.
Lightly and evenly stuff the cap with fiberfill.
The sailor cap is complete.
Assembly
• Attach the safety eyes between R11 and R12 of the head. Alternatively, embroider the eyes.
• Embroider the nose and eyebrows.
• Sew the ears to the sides of the head, level with the eyes.
• Sew the sailor cap to the head between R6 and R8. Position it slightly at an angle if desired.
• Sew the head to the body.
• Sew the arms to the body between R16 and R17.
Your sailor is ready!
Copyright & Credits
This pattern is designed by Svetlana Lyutova. Please do not copy, redistribute, or republish this pattern without permission. You may sell finished toys made from this pattern, but please credit the designer by tagging @svet_lana_lyutova when sharing your work.